Created on February 25th, 2026 at 03:39 pm
Japanese-Style Glazed Chicken Made Easily on the Stovetop
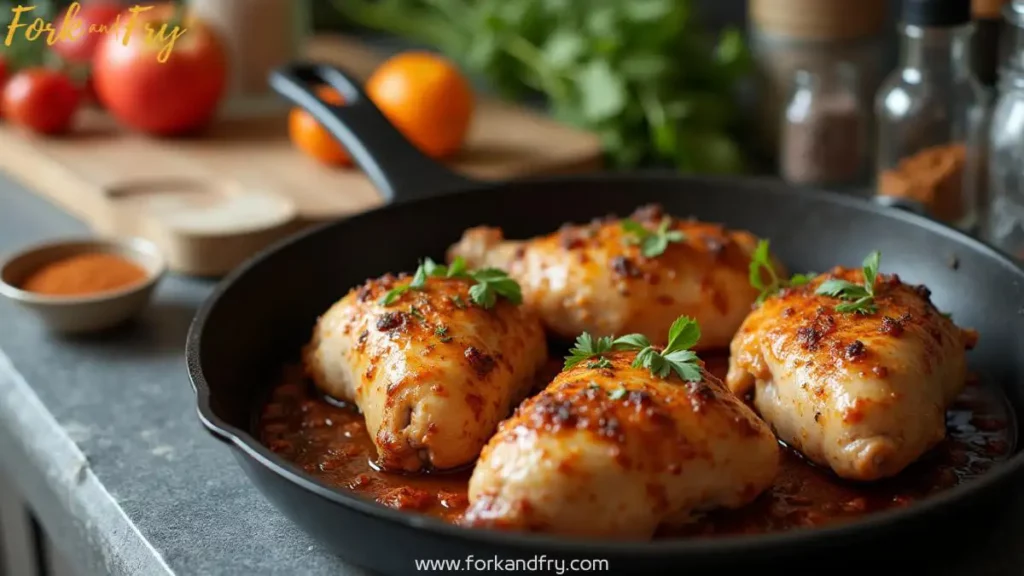
Chicken Yakitori Skillet is built for home kitchens that don’t have a charcoal grill but still want that sweet-savory Japanese glaze and caramelized chicken texture. Traditional yakitori is cooked over binchotan charcoal, which gives subtle smokiness and char. This skillet version recreates the balance of sweet soy glaze and controlled caramelization using direct stovetop heat.
The key is not smoke. The key is reduction.
By managing heat properly and allowing the sauce to reduce gradually, you create the glossy coating that defines yakitori without burning the sugars.
If you’re looking for a more traditional skewered preparation, Japanese Chicken Yakitori follows the classic grill-based method. And if you prefer ultra-fast, pantry-based glaze cooking, 3-Ingredient Orange Chicken BBQ Style offers a shortcut-style alternative.
This skillet yakitori sits right in the middle: authentic flavor profile, simplified cooking method.

What Makes Yakitori Different from Other Asian Glazed Chicken
Yakitori sauce, also known as tare, is thinner than typical American-style glazes. It relies on:
Soy sauce for salt depth
Mirin for sweetness
Sake for aroma
Sugar for caramelization
Unlike heavy cornstarch-thickened sauces, yakitori glaze thickens naturally through reduction. That means timing matters more than thickening agents.
In a skillet version, controlling surface moisture is essential. Too much liquid prevents caramelization. Too much heat burns the sugars.
Choosing the Right Chicken Cut
Boneless, skinless chicken thighs are ideal. They remain juicy even under higher heat and absorb marinade well.
Chicken breast can be used, but it must be monitored carefully to avoid dryness.
Cut the chicken into uniform, bite-sized chunks for even cooking.
Ingredients
Chicken
1½ pounds boneless, skinless chicken thighs
1 tablespoon neutral oil
Salt, lightly
Yakitori Sauce (Tare)
½ cup soy sauce
¼ cup mirin
¼ cup sake (or dry white wine)
2 tablespoons sugar
1 teaspoon grated ginger (optional)
1 garlic clove, grated (optional)
Optional garnish: sliced green onions, sesame seeds

Step-by-Step Instructions
Step 1: Prepare the Tare Sauce
In a small saucepan, combine soy sauce, mirin, sake, sugar, ginger, and garlic.
Bring to a gentle simmer over medium heat.
Allow the sauce to reduce for 5–7 minutes until slightly thickened. It should coat the back of a spoon lightly but remain pourable.
Remove from heat and set aside.
Pre-reducing the sauce gives better control when glazing in the skillet.
Step 2: Prepare the Chicken
Pat chicken dry and cut into evenly sized pieces.
Lightly season with salt.
Do not marinate in the sauce. Yakitori is traditionally glazed during cooking rather than soaked beforehand.
Step 3: Sear the Chicken Properly
Heat oil in a large skillet over medium-high heat.
Add chicken in a single layer. Do not overcrowd.
Let it sear undisturbed for 2–3 minutes before turning. Proper browning builds flavor and texture.
Cook until nearly done but still slightly undercooked in the center.
Step 4: Begin Glazing
Reduce heat to medium.
Pour about half of the reduced tare sauce over the chicken.
Allow it to simmer gently.
As the sauce reduces, spoon it over the chicken repeatedly.
Within 2–4 minutes, the glaze will thicken and begin clinging to the surface.
Step 5: Final Caramelization
Add a small additional splash of sauce if needed.
Continue cooking until the glaze becomes glossy and slightly sticky but not burnt.
Remove from heat immediately once coated.
Over-reduction will make the sauce too thick and overly salty.
Texture Expectations
The exterior should have light caramelization.
The glaze should appear glossy, not opaque.
The sauce should cling thinly, not form a heavy coating.
The flavor should balance salty, sweet, and aromatic depth without overpowering soy.
Controlling Heat to Avoid Burning
Because the sauce contains sugar and mirin, high heat can burn quickly.
If the sauce darkens too rapidly, reduce heat immediately.
If it thickens too much, add 1 tablespoon water and stir to loosen.
Cast iron retains heat strongly, so lower settings may be required.
Skillet vs Grill: What Changes
A grill produces smoke and deeper char.
A skillet produces cleaner caramelization and stronger glaze adhesion.
This version emphasizes glaze quality over smokiness.
If desired, a drop of toasted sesame oil at the end adds subtle aroma.
Serving Suggestions
Serve over steamed Japanese rice.
Pair with sautéed vegetables like bok choy or snap peas.
Add to rice bowls with shredded cabbage.
Serve as appetizer bites with toothpicks.
Yakitori also works well in bento-style meals.
Make-Ahead and Storage
Sauce can be made in advance and refrigerated up to one week.
Cooked chicken stores up to 3 days in an airtight container.
Reheat gently in a skillet over low heat.
Avoid microwaving at high power, which can toughen the glaze.
Frequently Asked Questions
Is this authentic yakitori?
It is a stovetop adaptation inspired by traditional yakitori flavor balance.
Can I skip the sake?
Yes. Dry white wine or even water can substitute, though aroma will be milder.
Why not marinate the chicken?
Traditional yakitori relies on glazing during cooking rather than soaking beforehand.
Can I make it sweeter?
Add a small amount of extra sugar, but balance carefully to avoid overpowering soy.
Can I use skewers in a skillet?
Yes, but ensure they fit the pan and rotate carefully.
This skillet method preserves the essence of yakitori while removing the need for a grill, making it practical, balanced, and weeknight-friendly.

Chicken Yakitori Skillet (No Grill Needed)
Equipment
- Large skillet (10–12 inch)
- Small saucepan (for tare reduction)
- Measuring Cups and Spoons
- Whisk or spoon
- Tongs or Spatula
- Cutting board
- Sharp knife
Ingredients
For the Chicken
- 1 1/2 lb boneless, skinless chicken thighs cut into evenly sized bite-sized pieces
- 1 tbsp neutral oil avocado, canola, or vegetable oil
- salt lightly, to taste
Yakitori Tare (Sauce)
- 1/2 cup soy sauce
- 1/4 cup mirin
- 1/4 cup sake or dry white wine (or water in a pinch)
- 2 tbsp sugar
- 1 tsp ginger grated (optional)
- 1 clove garlic grated or finely minced (optional)
Optional Garnish
- green onions sliced
- sesame seeds
Instructions
- Reduce the tare: In a small saucepan, combine soy sauce, mirin, sake, sugar, ginger (optional), and garlic (optional). Bring to a gentle simmer over medium heat and reduce for 5–7 minutes until slightly thickened and glossy. It should lightly coat the back of a spoon but still be pourable. Remove from heat.
- Prep the chicken: Pat chicken thighs dry and cut into evenly sized bite-sized pieces for even cooking. Season lightly with salt (go easy—the sauce is salty).
- Sear for browning: Heat neutral oil in a large skillet over medium-high heat. Add chicken in a single layer (work in batches if needed). Sear 2–3 minutes undisturbed to develop color, then flip and cook another 2 minutes until browned and nearly cooked through.
- Glaze in the skillet: Reduce heat to medium. Pour about half of the reduced tare over the chicken. Let it bubble gently for 2–4 minutes, tossing and spooning sauce over the chicken as it reduces. Add more tare as needed, a little at a time, until the chicken is evenly coated and glossy.
- Finish and stop at glossy: When the glaze clings and looks shiny (sticky but not burnt), remove from heat immediately. If the sauce tightens too much, splash in 1 tbsp water and toss to loosen.
- Serve: Garnish with sliced green onions and sesame seeds if desired. Serve over steamed rice or alongside sautéed vegetables.
Notes
Enjoyed this recipe? Leave a review!
There are no reviews yet. Be the first one to write one.
Products related to this category
Instant Pot Duo 7-in-1 Electric Pressure Cooker (6 Quart)
 BUY NOW ON AMAZON
HexClad 4.5Qt Hybrid Nonstick Skillet
 BUY NOW ON AMAZON
Ninja Foodi 6‑in‑1 Indoor Grill with Air Fry, Roast, Bake, Broil & Dehydrate (EG201)
 BUY NOW ON AMAZON
McCormick Grill Mates Chicken Seasoning (Pack of 3)
 BUY NOW ON AMAZON